

Getting Started with Kafka-Python


This blog is basically a short tutorial of how you can have Apache Kafka running on your machine and how you can use the Kafka-python library to produce and consume messages.
In the tutorial I also provide an example of a producer-consumer app. The producer is responsible for reading data from a csv file and converts each row of a the cvs file into a json object and sends it to a broker while the consumer reads the json data from a broker and prints it to the console.
What is Kafka :
Kafka is an open-source software that provides a framework for storing, reading, and analyzing streaming data. It is based on a distributed publish-subscribe messaging system that maintains feeds of messages in partitioned and replicated topics.
There are a few concepts that needed to be explained in order to understand the Kafka ecosystem.
Kafka is based on a Publish-Subscribe System.
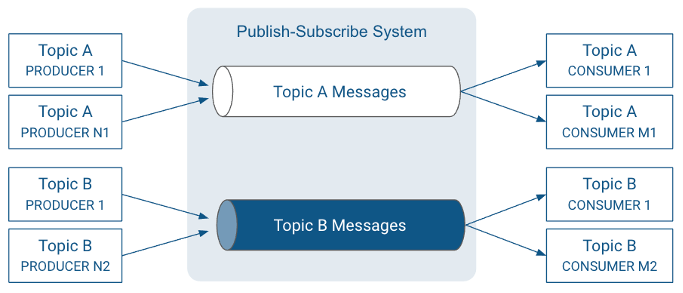
Record: A record is a publish-subscribe message. A record consists of a key/value pair and metadata including a timestamp.
Broker: A broker is a server that stores messages sent to the topics and serves consumer requests.
Topic: A topic is a queue of messages written by one or more producers and read by one or more consumers.
Producer: A producer is an external process that sends records to a Kafka topic.
Consumer: A consumer is an external process that receives topic streams from a Kafka cluster.
Client: Client is a term used to refer to either producers and consumers.
Setting up the Environment
The Apache Kafka website provides an easy installation guide which can be found on this link apache kafka quick . after you have download the kafka folder before running the ZooKeeper and the Kafka server, the server.properties file needs to be modified which is found in the config folder.
The following lines inside the server.properties file need to be modified:
#advertised.listeners=PLAINTEXT://your.host.name:9092
Uncomment the line and insert your IP address, mines for example was changed to : advertised.listeners=PLAINTEXT://localhost:9092
and save the file .
This configuration is needed to connect the brokers from external clients. Here is a link with an indeep description of the topic confluent apache
Next install Kakfka-Python with pip install :
pip install Kafka-python
Lets write some code
In our example we’ll create a producer that reads data from a csv file and sends them to our Kafka broker. A conumser will read the data from the broker and print them to the console output.
Create a new Python script named producer.py and import json , sleep logging , reader and KafkaProducer.
from csv import reader
import json
from time import sleep
from kafka import KafkaProducer
import logging
Then Initialize a new Kafka Producer:
producer = KafkaProducer(bootstrap_servers=['localhost:9092'],
                         value_serializer=lambda x: json.dumps(x).encode('utf-8'))
Next we write a function for reading the csv file, for each row of the csv file, we create a json object that will be sent to a broker.
read_csv_file and get_as_json are help methods need to help in the conversion of the csv to a json object.
def read_csv_file(file_path):
    """Create a csv reader."""
    csvFile = open(file_path, 'r')
    csvReader = csv.reader(csvFile)
    return csvReader
def get_as_json(line):
    """gets a json string"""
    row = line.split(";")
    world_data = WorldData(row[0], row[1], row[2])
    return world_data.as_json()
The WolrdData object models the data contained in the csv file and has a method To convert the data into a json object.
class WorldData:
    def __init__(self, date, number_of_users, population_in_percent):
        self._date = date
        self._number_of_users = number_of_users
        self._population_in_percent = population_in_percent
    def as_json(self):
        return dict(
            date=self._date,
            number_of_users=self._number_of_users,
            world_population_in_percent=self._population_in_percent)
Some helper methods for tracing if the send message to broker succeeded or not.
def on_send_success(record_metadata):
    """in case of successs logs the topic and which partition the data has ended to"""
    print(record_metadata.topic)
    print(record_metadata.partition)
    print(record_metadata.offset)
def on_send_error(excp):
    """ in case the is an error makes logs an errback message"""
    logging.log.error('I am an errback', exc_info=excp)
This can be done by calling the send method on the producer and specifying the topic and the data . value_serializerwill automatically convert and encode the data.
# Iterate Over each row of the csv file
for rows in csvReader2:
    # using list comprehension
    listToStr = ' '.join([str(elem) for elem in rows])
    jsonString = get_as_json(listToStr)
    producer.send(topicName, value=jsonString).add_callback(on_send_success).add_errback(on_send_error)
    print("")
    print('Message sent')
    sleep(2)
The Consumer Code
Create a new file consumer.py and import the following libraries :
loads ,logging and KafkaConsumer
from json import loads
from kafka import KafkaConsumer
import logging
Then Initialize a Kafka Consumer:
consumer = KafkaConsumer(
    topicName,
    bootstrap_servers=['localhost:9092'],
    auto_offset_reset='earliest',
    value_deserializer=lambda x: loads(x.decode('utf-8')))
We extract the data from the consumer by looping through the consumer object . The consumer will continue listening until the broker doesn’t respond anymore .
# Read data from kafka
for message in consumer:
    message2 = message.value
    print(message2)
The message is retrieved with .value methodand printed on to the console.
Sources
confluent documentation on kafka
For me writing blogs is just a way of documenting my work, this blog was inspired by Stevens blog on the topic which I provided a link up above, this is my first blog post hope you enjoyed reading it. you can follow me on the links provided below for future articles.